Data Curation
Data Curation transforms unstructured clinical text into validated, structured datasets that power patient registries, research cohorts, and quality reporting initiatives. By combining advanced NLP with expert review workflows, clinical and data science teams can automatically extract, validate, and maintain high-quality clinical data at scale.
Extract and Validate Clinical Data from Unstructured Text
Clinical documentation contains rich information locked in unstructured text—provider notes, pathology reports, radiology findings, and discharge summaries. Data Curation uses configurable ontologies and NLP pipelines to extract this information, structure it according to your specifications, and present it for expert validation.
The result is a transparent, auditable process that converts clinical narratives into research-ready datasets while maintaining full traceability to source documents.
Data Curation Workflow
This video demonstrates the interface visually without audio narration.
Clinical Applications of Data Curation
Data Curation adapts to diverse clinical domains and organizational needs:
- Cancer Registries: Automated abstraction of tumor characteristics, staging, and treatment data from pathology reports and clinical notes
- Disease-Specific Registries: Building cohorts for diabetes, cardiovascular disease, rare diseases, and other chronic conditions
- Research Cohorts: Identifying and characterizing patient populations for clinical trials and observational studies
- Quality Measures: Extracting populations and clinical indicators for HEDIS, MIPS, and institutional quality reporting
- Public Health Surveillance: Aggregating data for reportable conditions, outbreak monitoring, and population health initiatives
Automated Extraction with Expert Validation
Data Curation follows a systematic workflow from schema definition to validated output:
- Define Your Schema: Create or select an ontology that specifies which clinical concepts to extract and how to structure them
- Select Your Population: Choose patient cohorts or document sets for processing using flexible filtering criteria
- Run Automated Extraction: NLP pipelines process clinical text and extract structured data aligned to your ontology
- Review and Validate: Clinical experts review extracted values, examine supporting evidence, and make corrections when needed
- Track and Audit: Version history maintains a complete audit trail of all changes and extractions
- Export and Use: Curated data integrates with analytics platforms, research databases, and external reporting systems
Key Capabilities
The Data Curation module provides comprehensive tools for building and maintaining clinical registries:
- Ontology-Based Schema Design: Define any custom extraction schema using flexible ontologies that specify fields, data types, and extraction logic
- Cohort-Driven Processing: Select patients or documents using clinical criteria, demographics, date ranges, and document types
- Automated NLP Extraction: Process clinical text at patient or document level, extracting structured values with confidence scores
- Evidence Transparency: Trace every extracted value back to source documents with highlighted evidence and contradictory findings
- Expert Review Workflows: Validate, edit, and override automated extractions with full audit trails
- Version Control: Track all changes over time with the ability to view, compare, and restore previous versions
- Flexible Extraction Modes: Choose patient-level aggregation for registries or document-level extraction for detailed analysis
Working with Data Curation
Monitoring Your Curation Jobs
The Data Curation dashboard provides a centralized view of all your extraction workflows, both active and historical. At a glance, you can see the total number of configured automations, how many have completed successfully, which jobs are currently running, and what's queued for execution.
The main table lists all automation runs with essential details: the automation name, current execution status, which ontology is being used, whether extraction is happening at the patient or document level, how many patients or documents are being processed, and when the job was executed. Click the results button on any completed run to review and validate the extracted data.
This dashboard serves as your command center for monitoring curation throughput and quickly accessing results.
Reviewing and Validating Results
When you open a completed curation run, you enter the validation workspace where clinical experts review and refine extracted data. The interface divides into two main areas: a patient list on the left for browsing and filtering, and a detailed view on the right showing structured output for the selected patient.
The system organizes results into several specialized views, each designed for specific validation tasks.
Review Patient Clinical Profiles
The Overview tab presents a patient's complete clinical profile as structured by your ontology. Information might include demographics, clinical findings and diagnoses, pathology and histology results, laboratory metrics, medications and procedures, and any domain-specific attributes relevant to your registry—such as social history for SDOH studies or detailed cancer staging for oncology registries.
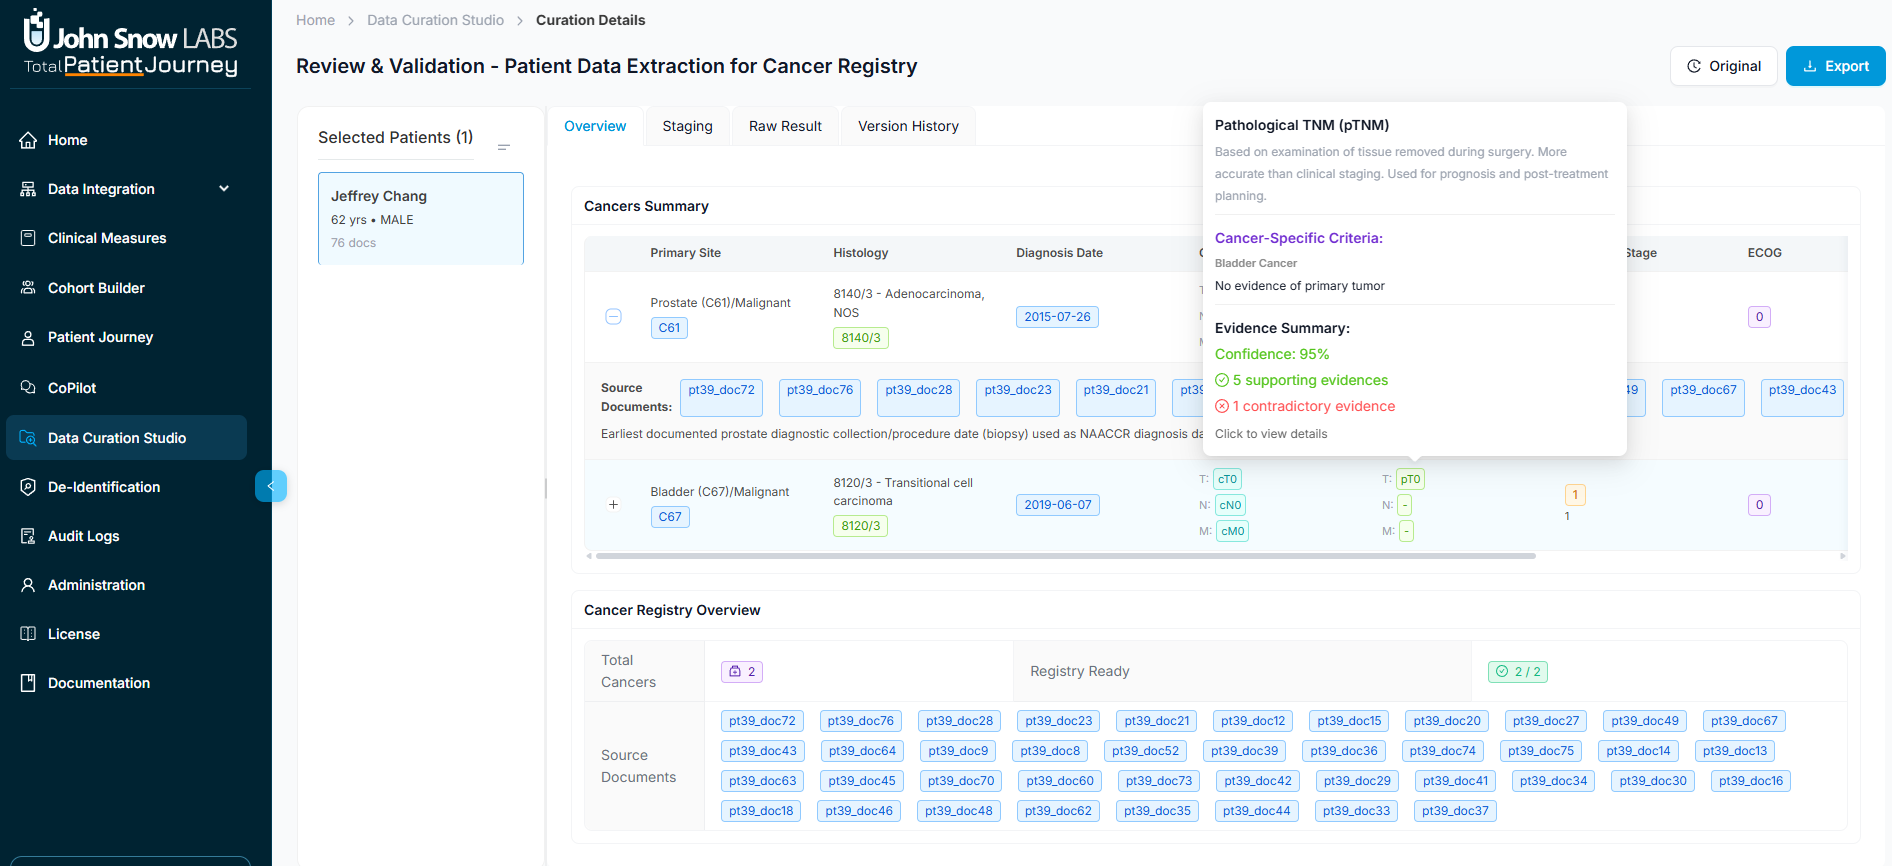
What makes this view powerful is its transparency. Each field is expandable, revealing not just the final consolidated value but also the source-level evidence, extraction logic notes, and references to the underlying documents. This lets clinical reviewers quickly verify that extracted values accurately reflect the patient's record.
Staging: Specialized Cancer and Disease Classification
For oncology registries and other staging-based schemas, the Staging tab provides a focused workspace for reviewing disease classification. Values are automatically populated by the NLP extraction, but you can see the underlying evidence for each staging component and manually override values when clinical judgment differs from the automated extraction.
The tab adapts to your ontology's structure, whether that's TNM staging for cancer, AJCC classifications, or custom severity scales for other conditions.
Understanding the Evidence Behind Each Value
Click on any extracted field to open the evidence modal, which shows you exactly how the system arrived at each value. You'll see the extracted value, supporting evidence from source documents with highlighted text, any contradictory evidence that suggests alternative interpretations, and confidence scores from the NLP models.
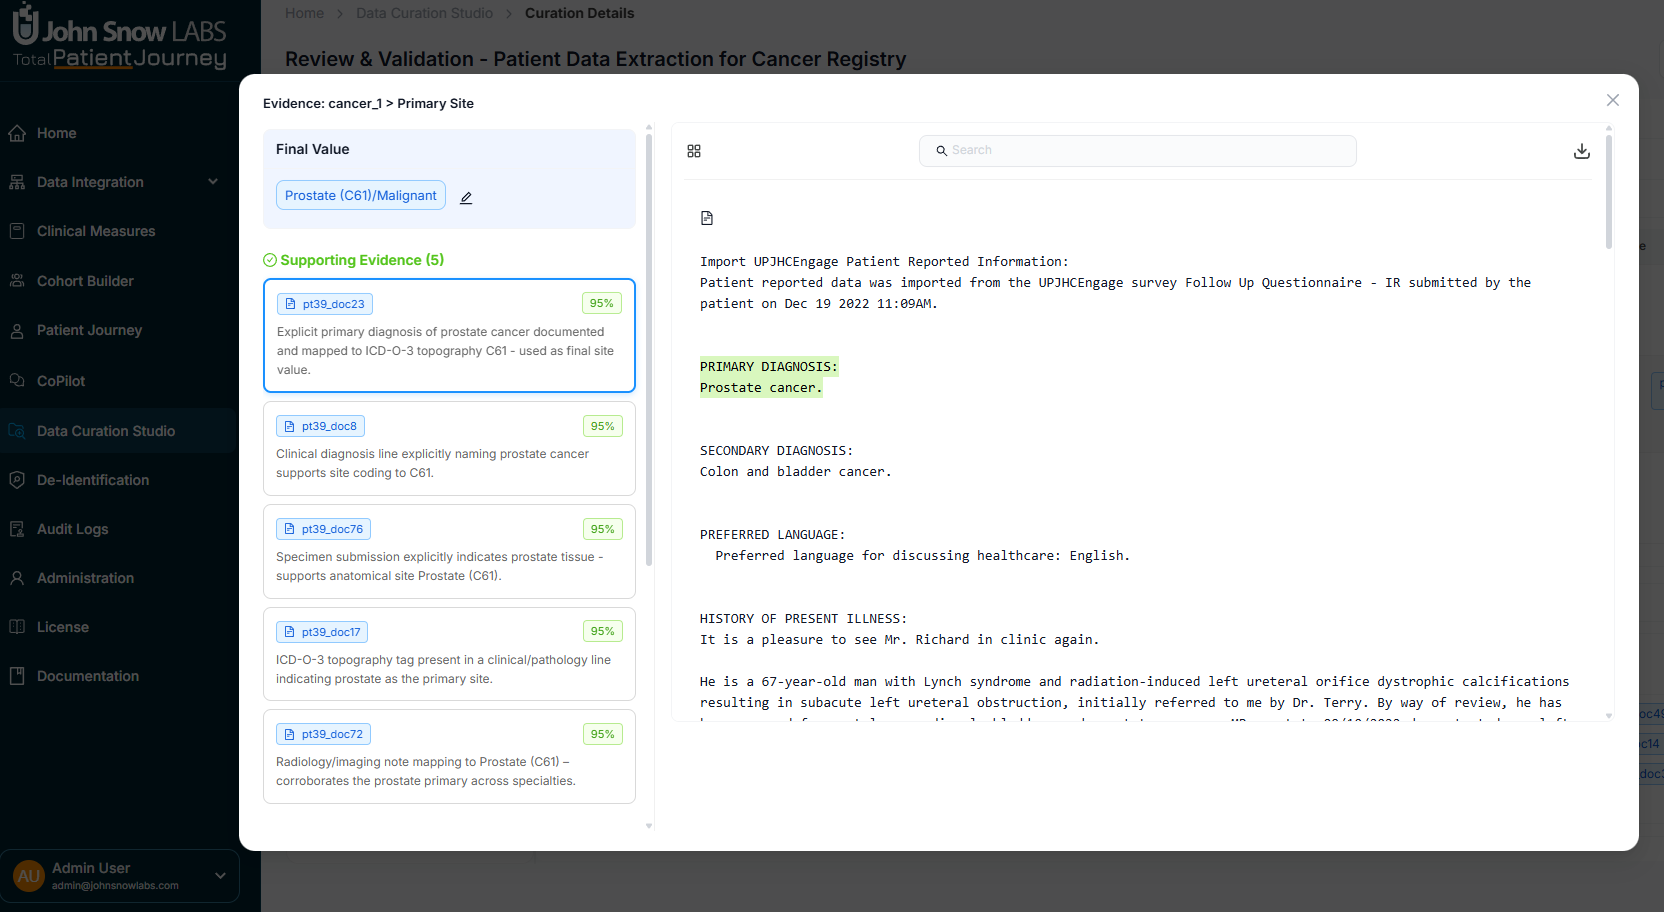
The modal lets you navigate through multiple documents, see how highlights align with specific fields, and compare different sources of information. This level of transparency turns automated extraction into a trustworthy clinical tool, allowing experts to validate findings with the same rigor as manual abstraction.
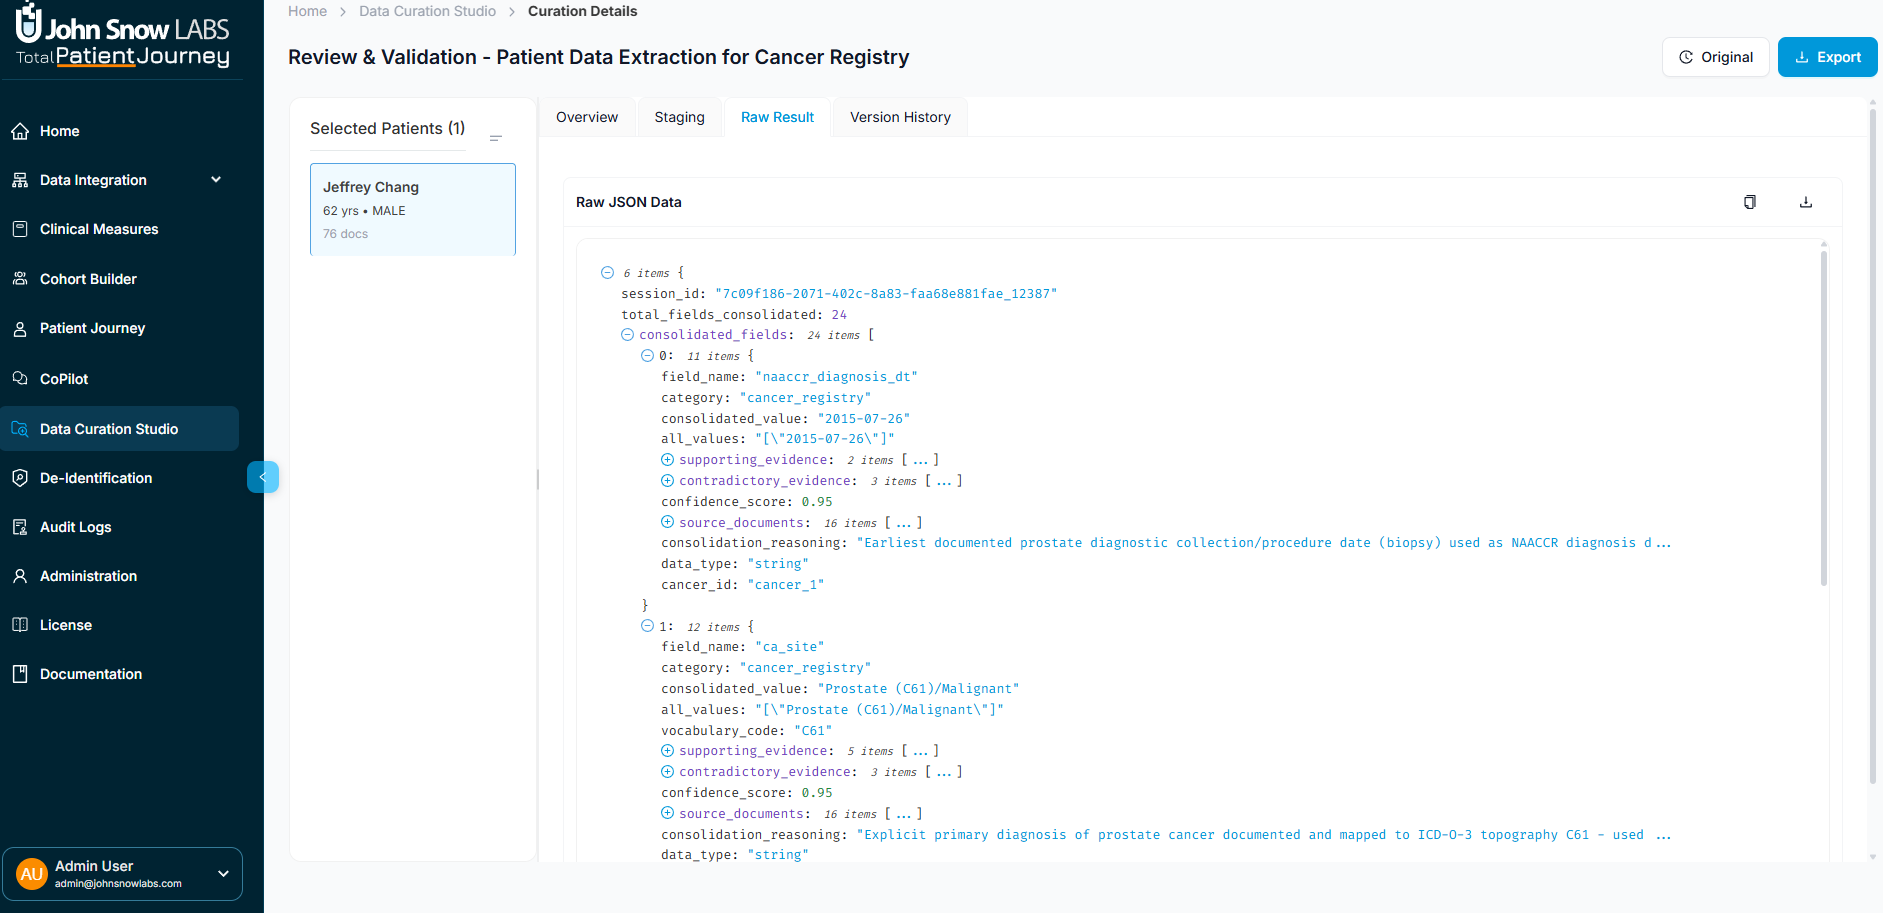
Raw Results: For Technical Users
The Raw Results tab displays the complete JSON output from the extraction engine, including field-level extractions, consolidation metadata, document-level statistics, NLP confidence scores, and cross-references to source documents. Data engineers and integration teams use this view when building downstream pipelines or troubleshooting extraction logic.
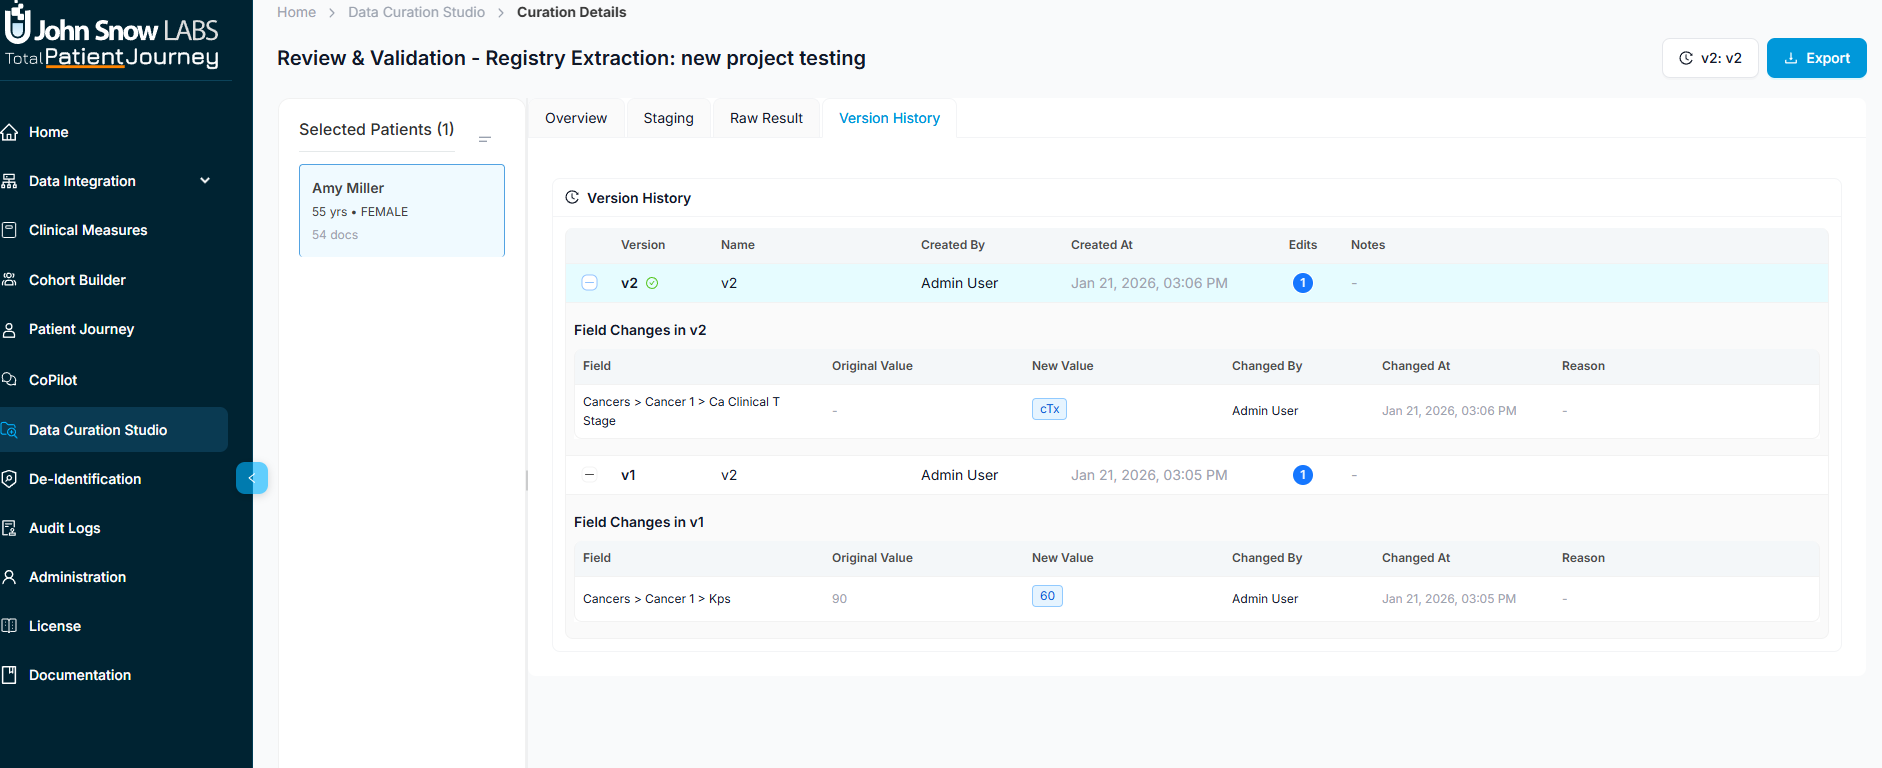
Version History: Complete Audit Trail
Every edit and override is tracked in the Version History tab. You can view and compare historical versions, restore previous states if needed, and see exactly who made which changes and when. This audit trail supports regulatory compliance, quality assurance reviews, and reproducibility requirements for research registries.
Setting Up a New Curation Job
Creating a new automation follows a guided configuration process that walks you through defining what to extract, from which patients, and how to process the data.
Step 1: Choose Your Extraction Schema
Start by selecting an ontology that defines your registry structure. The system shows you the ontology's name and description, total number of fields organized by category, which fields are required versus optional, what data types are expected, and any extraction guidelines that will guide the NLP processing.
You also have the option to include OMOP records, which merges structured data already captured in the platform's integrated data model with NLP-extracted values from unstructured text. This creates a more complete picture by combining both structured and unstructured sources.
Step 2: Select Your Patient Population
Next, choose which patient cohorts will provide your processing population. Each cohort displays its name and description, patient and document counts, and a metadata preview. You can select multiple cohorts, which the system will merge to define your final population.
This cohort-based approach ensures you're only processing relevant patients—for example, selecting a "Breast Cancer Patients" cohort for a breast cancer registry, or combining multiple disease cohorts for a multi-condition study.
Step 3: Refine Your Selection and Choose Extraction Mode
Now refine your population further using clinical and demographic filters. Choose document types (like pathology reports or progress notes), date ranges to focus on specific time periods, demographic criteria including age, gender, race, and ethnicity, and clinical filters such as diagnoses or keywords.
At this stage, you also select your extraction mode. Patient-level extraction produces one consolidated result per patient by aggregating information across all their documents—ideal for patient registries. Document-level extraction creates separate results for each document, which is useful when you need to track information over time or analyze specific document types.
A real-time counter updates as you adjust filters, showing exactly how many patients and documents you've selected.
Step 4: Add Curation Metadata
Give your automation a descriptive name (required) and optionally add a detailed description. This metadata helps with version control, tracking multiple curation iterations, and organizational reporting.
Step 5: Review and Launch
Before execution, review your complete configuration: selected cohorts and patient count, extraction mode, a summary of the ontology schema, and estimated workload. When everything looks correct, click "Create Automation" to launch the extraction pipeline.
The job will appear on your dashboard where you can monitor its progress and access results once completed.
Managing Ontologies
Ontologies are the foundation of Data Curation—they define what information to extract and how to structure it. The ontology management interface lets you create, view, edit, and organize these schemas to match your specific registry needs.
Browsing Your Ontologies
The ontology list displays all available schemas in your system. For each ontology, you can see its name, description, field count, and creation date. Actions let you view details, edit the schema, or delete ontologies you no longer need.
Viewing Ontology Details
Opening an ontology shows its complete configuration. General information includes the name, description, total field count, and when it was last updated. The field details section lists each field's name and display name, data type and category, whether it's required, extraction instructions that guide the NLP models, and example values that illustrate expected outputs.
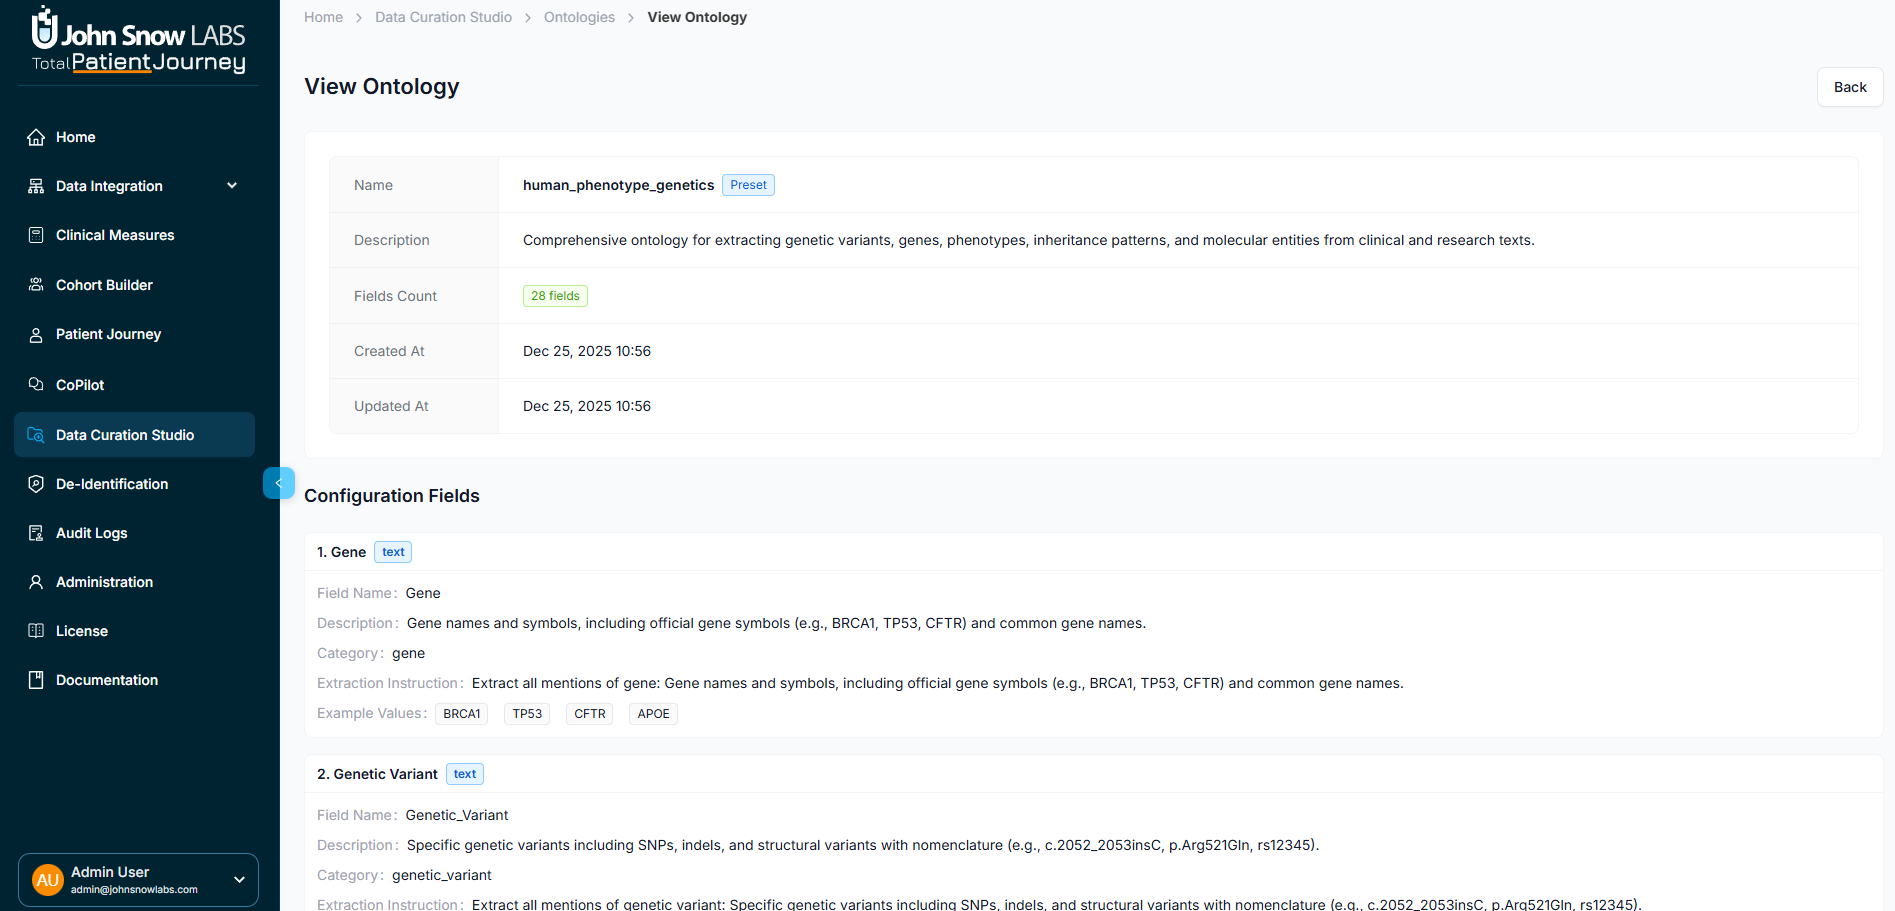
This view gives you a comprehensive understanding of how the schema is structured and what the NLP extraction will produce.
Editing Existing Ontologies
As your registry requirements evolve, you can modify ontologies by updating general metadata like name and description, adding new fields to capture additional information, editing existing fields to refine data types or extraction instructions, or removing fields that are no longer needed.
Changes to an ontology affect future curation runs but don't alter previously extracted data, ensuring consistency of historical results.
Creating New Ontologies
Building a new ontology follows a straightforward process. Start with the ontology name and description to define its purpose. Add fields one by one, specifying each field's name, display name, data type, category, whether it's required, and extraction instructions that tell the NLP system what to look for and how to interpret it.
You can also provide example values to illustrate expected outputs. Once configured, save the ontology and it becomes available for new curation jobs.
This flexibility means you can create highly specialized schemas for specific clinical domains—from detailed oncology registries with staging fields to SDOH assessments capturing social risk factors, or custom research cohorts tracking unique study variables.
Best Practices for Successful Curation
Getting the most from Data Curation involves thoughtful ontology design and systematic validation workflows.
Design Precise Ontologies
The quality of your extracted data starts with the quality of your ontology. Write clear, specific extraction instructions for each field that tell the AI system exactly what to look for and how to interpret ambiguous cases. Define appropriate data types and categories that match your downstream analytics needs. Be explicit about what counts as a valid value and what doesn't.
Well-designed extraction instructions dramatically improve NLP accuracy and reduce the need for manual corrections during validation.
Start Small and Validate
Before processing thousands of patients, run a pilot batch on a smaller sample—perhaps 50-100 patients. Review the results carefully, examining the evidence for extracted values and identifying patterns in extraction errors. Use these insights to refine your ontology's extraction instructions, then run another pilot batch to confirm improvements.
This iterative approach catches configuration issues early, before they affect large-scale extractions.
Regularly Audit Evidence
Even after initial validation, periodically review the evidence behind extracted values to monitor ongoing system performance. Look for patterns in confidence scores—consistently low scores on specific fields may indicate unclear extraction instructions or inherent complexity requiring human review.
The evidence modal makes this auditing process efficient by letting you quickly drill into supporting and contradictory documentation.
Maintain Complete Audit Trails
Use the version history feature to document all manual overrides and corrections. When clinical experts change automated extractions, these edits become valuable training signals for improving your ontologies. Regular review of version history also supports quality assurance processes and regulatory compliance requirements.
Leverage Extraction Instructions Iteratively
As you review results, you'll discover edge cases and ambiguities the initial ontology didn't fully address. Update extraction instructions with specific guidance for these cases. For example, if the system struggles distinguishing between historical diagnoses and current conditions, add explicit instructions about how to interpret temporal language.
Each refinement makes future extractions more accurate, gradually reducing the validation burden on clinical experts.
Summary
Data Curation transforms the labor-intensive process of clinical abstraction into a scalable, transparent, and auditable workflow. By combining ontology-based schema design with advanced NLP extraction, expert validation interfaces, and complete evidence traceability, the system delivers high-quality structured data from unstructured clinical text.
The result is a powerful platform for building patient registries, research cohorts, and quality measure populations that can keep pace with your organization's analytical needs while maintaining the rigor and accuracy that clinical decision-making demands.